Configuring payors
When configuring payors, you have the following options:
-
Import payor-level detail information directly from your general ledger during the data import.
-
Group the payors into a single payor or any number of payors within the plan files.
-
Preserve payor details imported for use in the Deductions Model calculator, which saves time and minimizes manual entry errors.
-
Categorize payors into specialized groups to include in your deductions forecasts.
When you load data into Rolling Forecasting, you can choose to summarize by payor, which brings in more payor detail, or you can choose not to summarize by payor. Not summarizing by payor detail results in a smaller plan file that lacks full detail but may provide what your organization requires. The tradeoff is that if you use the Deductions Model calculator, it will not be populated with data at the payor-specific level.
If you summarize by payor, the plan files display all the payors individually. If you have many payors, your plan files can get quite long, requiring a lot of vertical scrolling or extensive use of the Main ribbon tab’s GoTo feature. This also means that potentially more work will be required if you need to make many adjustments. However, grouping payors can simplify such tasks, making it a better tradeoff because you keep payer detail for working with deductions but manage it more easily at the group level within plan files.
For each RFGroup plan file you work with, when the Statistics, Revenue, and Deduction calculation methods are populated, the corresponding calculation methods are displayed according to how you imported the GL General Ledger data and configured payors.
Q. I have data in forecast tables stored at an individual payor level and not at a remapped or consolidated level. Is the data going to be double counted now?
A. No. The data will come in unchanged and be stored at the individual payor level. The grouping occurs only at the plan file level. In the plan file Forecast worksheet, the forecast columns, adjustments, etc., will save to the database tables at the group payor level. The underlying individual payors will not be affected. You will not get the forecasted results at the individual payor level for grouped payors, however.
IMPORTANT: Processed historical RFPeriod values will remain as-is unless you reprocess that period. If reprocessed, the grouping occurs and the Custom Save Tags prevent double counting. However, custom reports will have to be adjusted to point to Payor.RF_PayorGrouping rather than Payor.Payor if you want to use new mapping.
Q. What about adjustments and rates? How does grouping payors affect existing plan files?
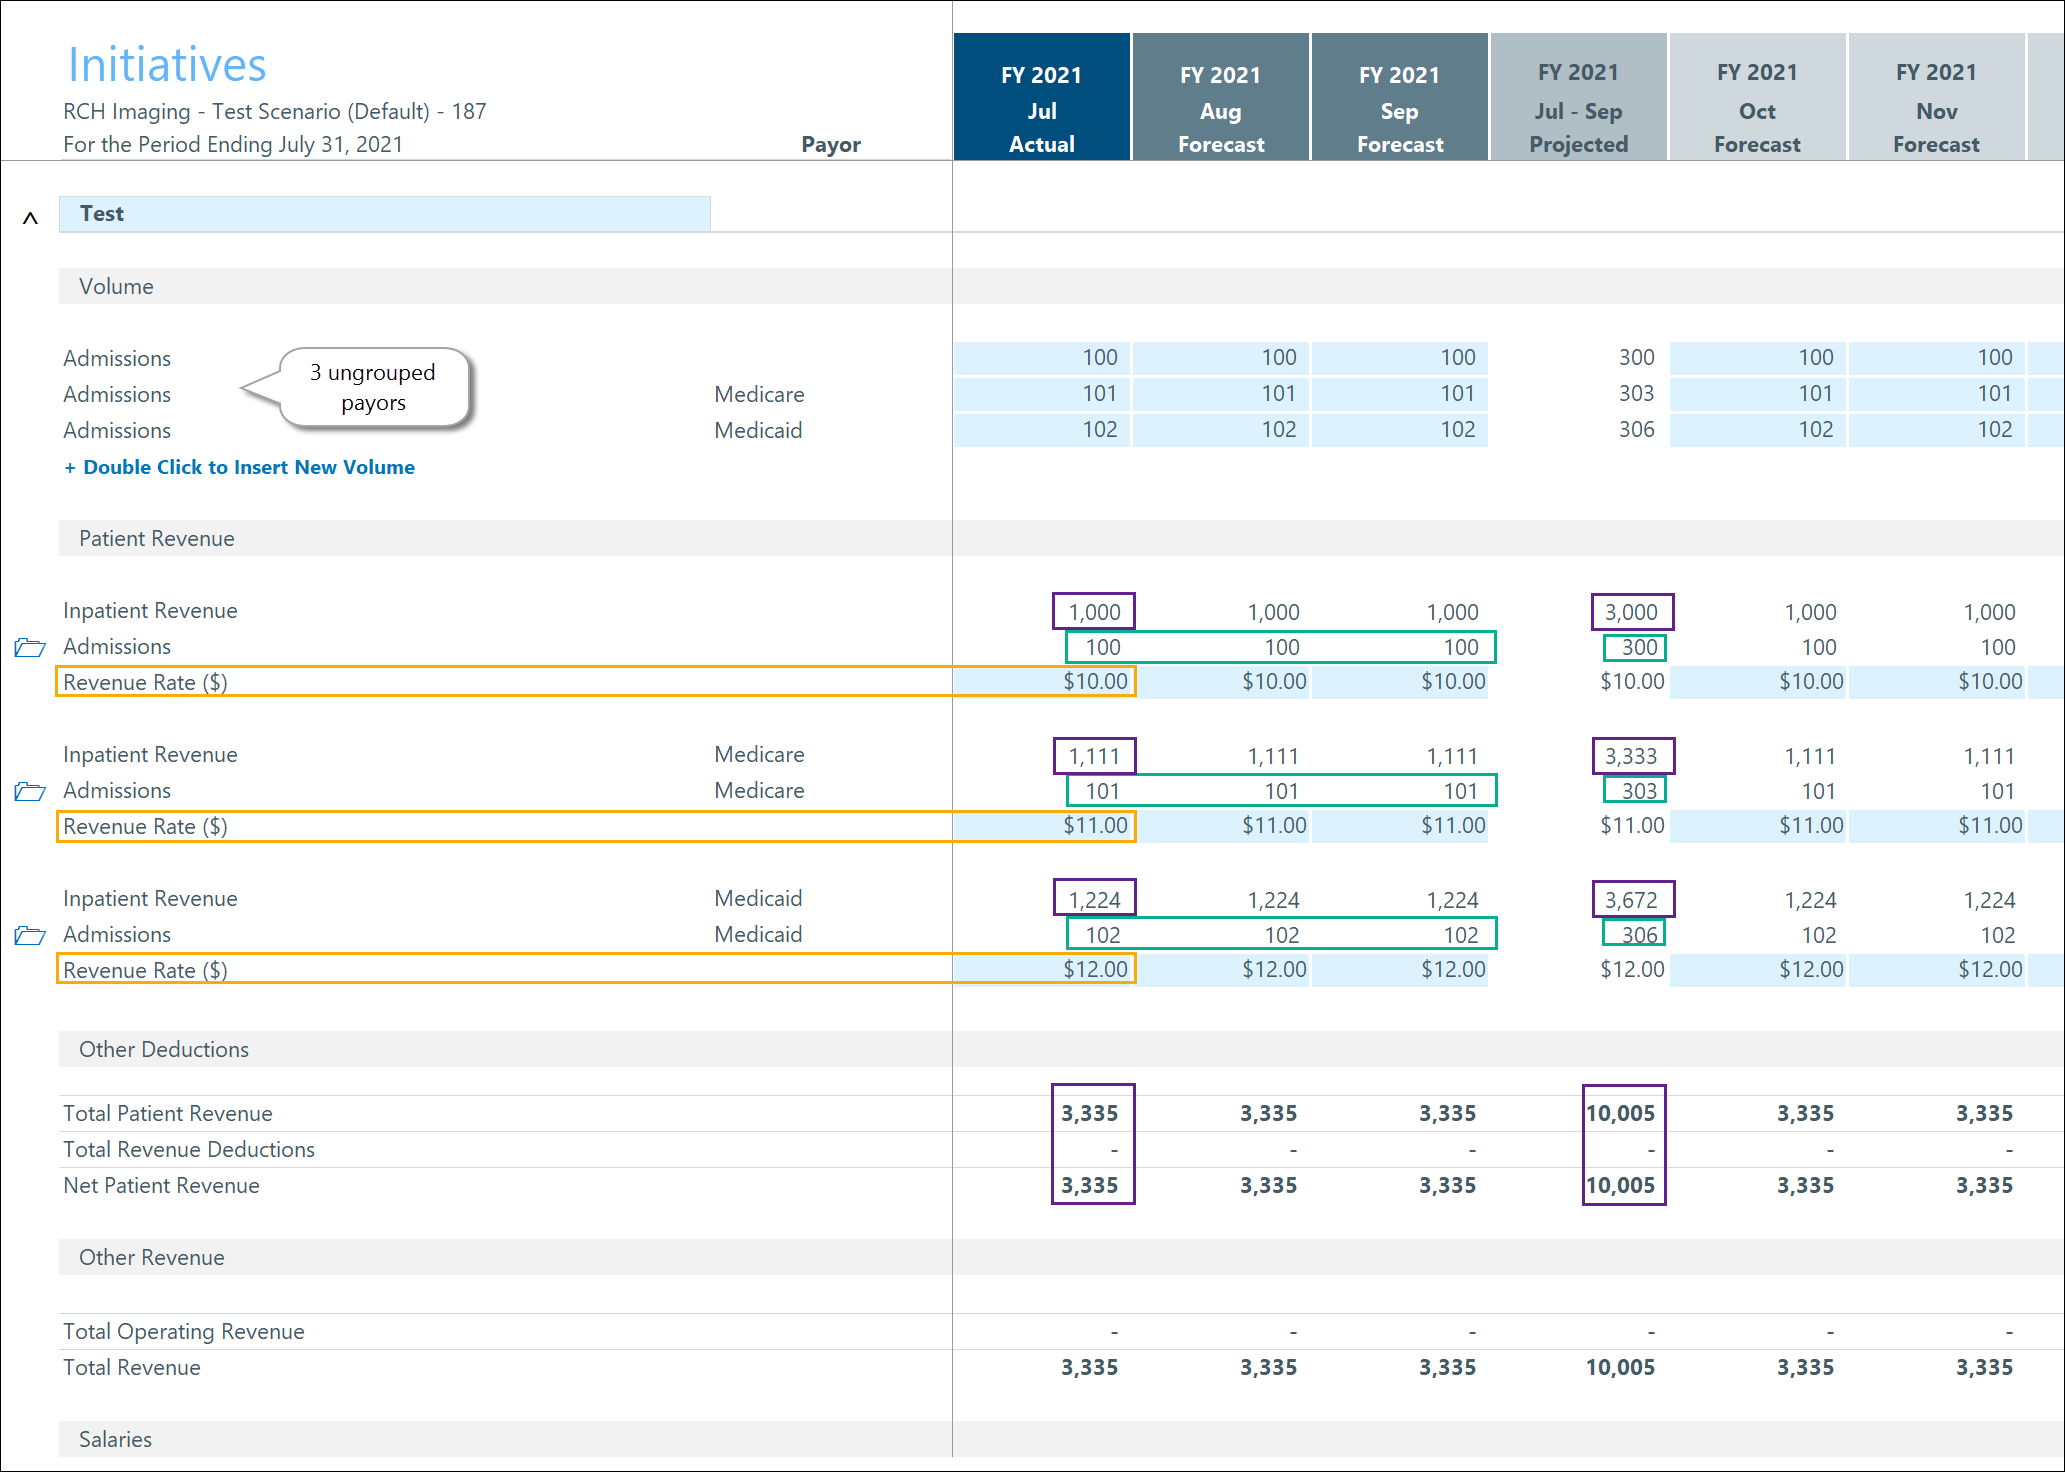
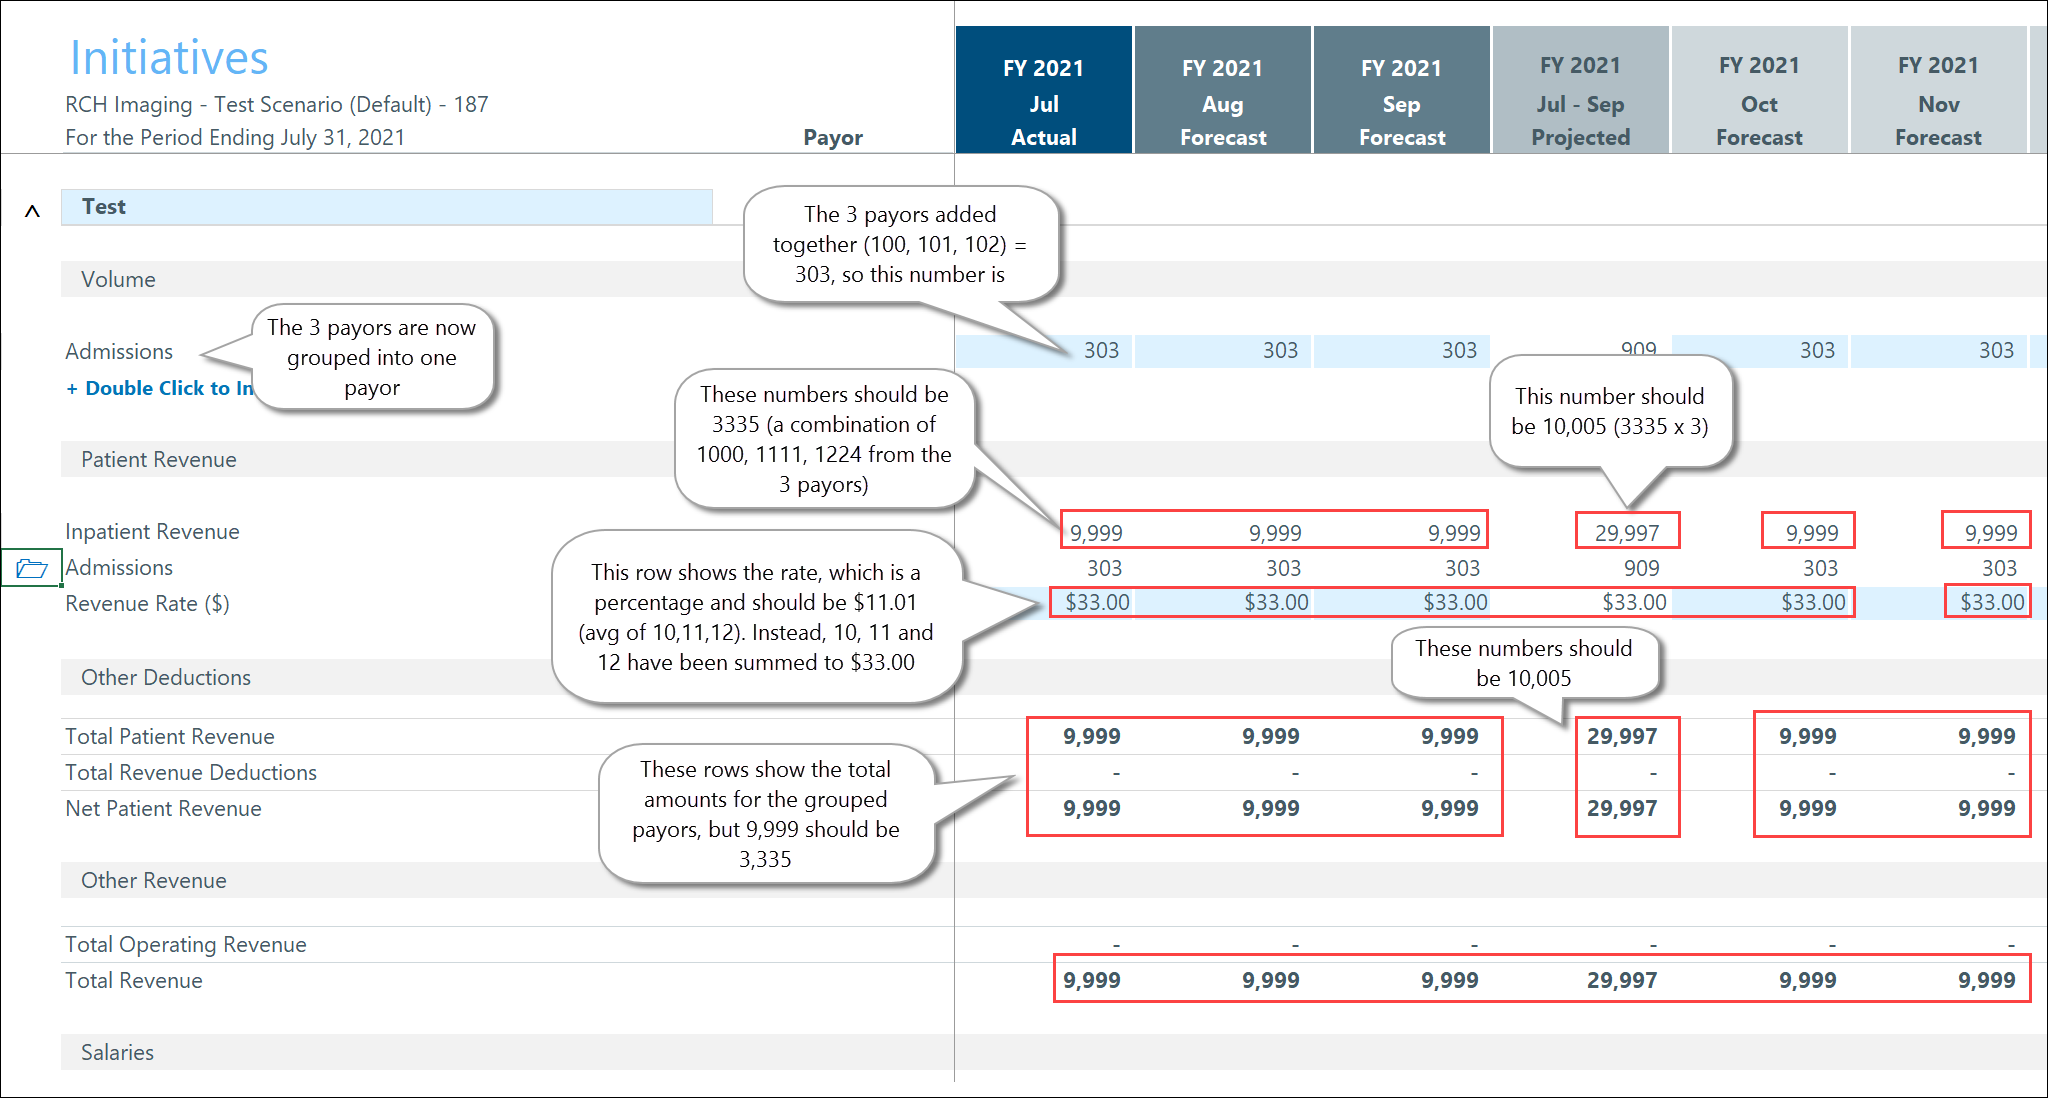
A. In the plan file Forecast and Initiatives worksheets, when you make a non percentage adjustment, the results of the adjustment on the original amounts roll together and add up correctly for grouped payors. For example, if you add $25 dollars as an adjustment to each payor, and your group contains 4 payors, the adjustment will be applied to each payor in the group and the total amount of the adjustment will be displayed as $100. (Note that the individual payors will not be displayed on the worksheet, however.) However, when you adjust a rate, FTE, or other amount by a percentage, the system, instead of taking an average of the percentage and applying it to the group, it sums the percentage, resulting in incorrect rates and totals. The three following examples from a plan file Initiatives worksheet illustrate this using rates.
-
Initiative results for 3 ungrouped payors:
The rates for each of the three payors is displayed, and the totals are correct.
-
Initiatives after the 3 payors are grouped:
After the three payors are grouped, notice that rolling up (summing) the rates results in incorrect totals and rates, which need to be corrected.
-
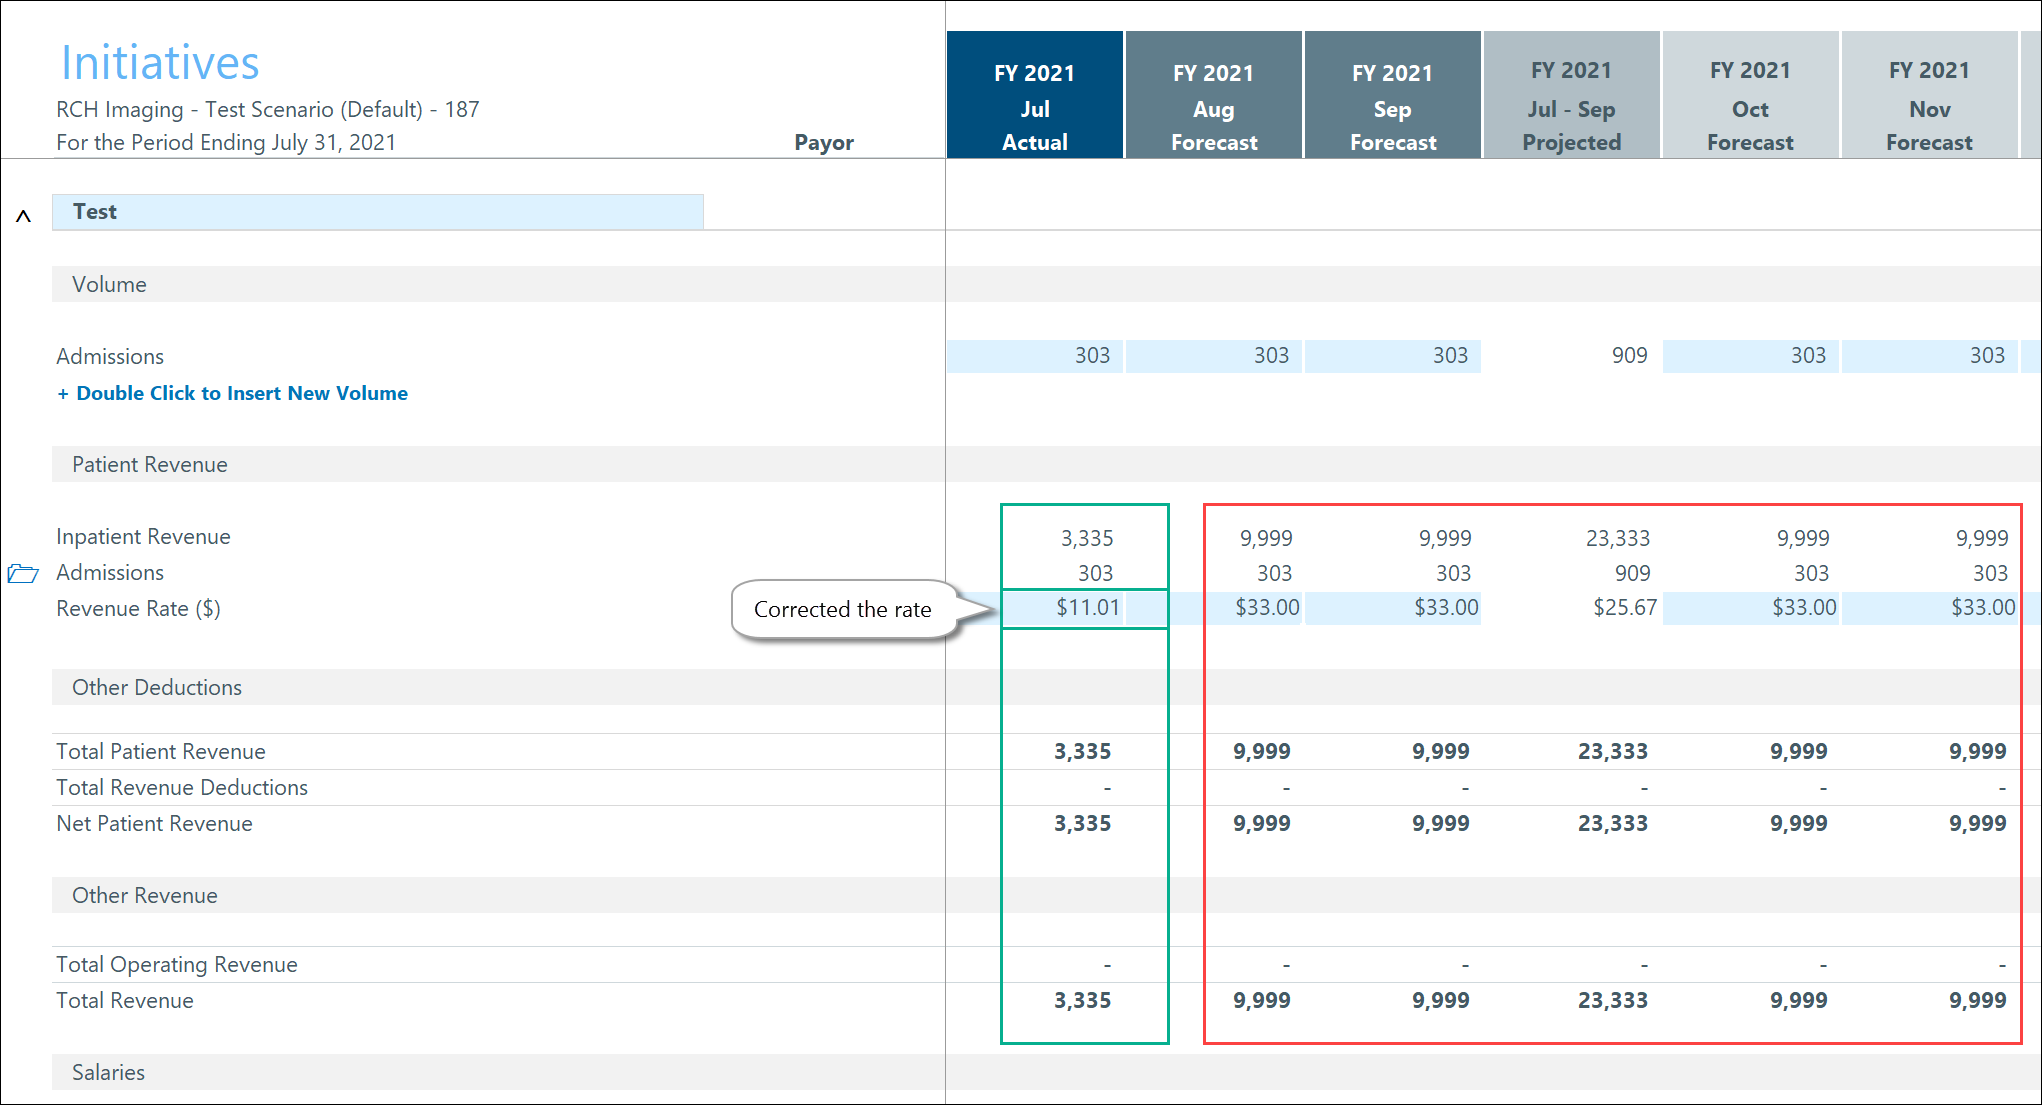
Initiatives after rate is corrected:
After saving and reopening the plan files, you will need to manually correct the cells that contain summed percentages so that they reflect the actual percentage adjustments/rates used. You may also need to correct amounts in other cells, so be sure to check all the ones affected by the percentage adjustments/rates. In the following example, the rate for the first column has been corrected. The other columns still need to be corrected.
If your organization summarizes GL data by payor, use these instructions to group payors together in plan files.
Associate payor mappings to Revenue, Deduction, and Statistic RFCodes so that payor data elements can be configured and reported on at the specific level you need.
NOTE: You can have a maximum of two grouped plan file levels. This means that your payor group is level 1. Payors you map to the group payor are level 2. You cannot map a payor to a payor that is mapped to the group (no third-level payors allowed).
To group payors:
-
In the RF Admin task pane under Tables, double-click Payor Configuration Utility.
-
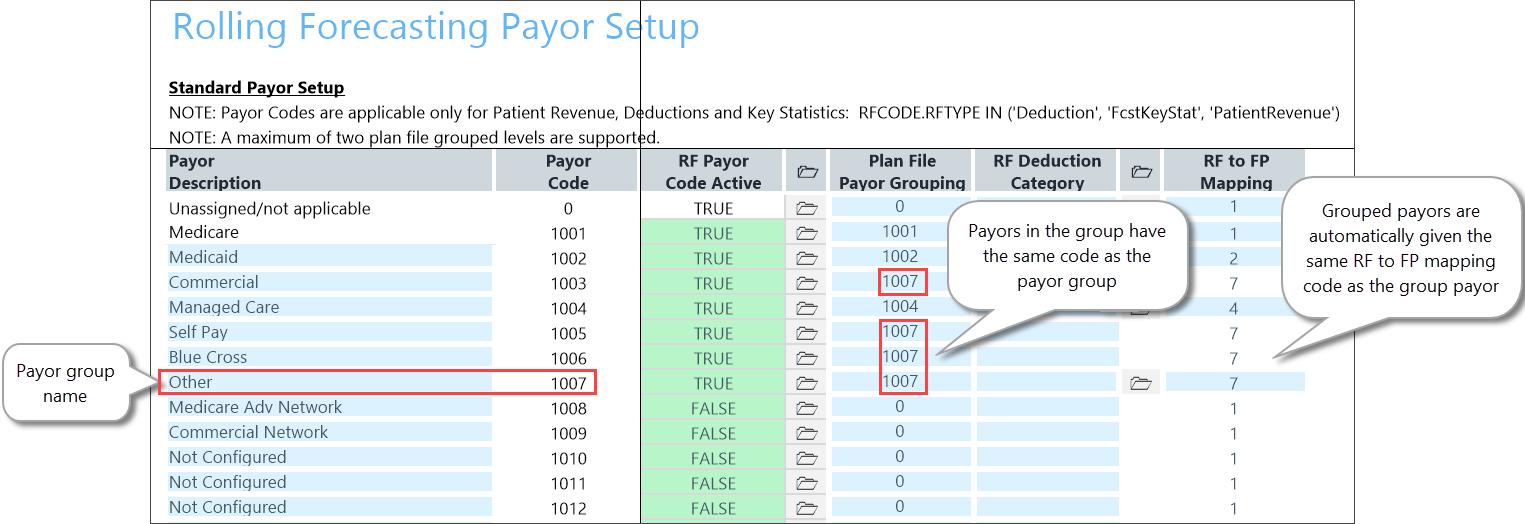
In the Payor Description column of the Payor Setup utility, select the next available “Not Configured” row and then type a name for the payor group into the blue cell.
NOTE: You can change the name of any payor except Medicare.
-
In the Active column for that row, select TRUE.
-
Add payors to the new group:
-
For each payor to include in the group, in the Plan File Payor Grouping column, double-click the folder icon (
 ) to the left of the column, and then select the name of the group in the Choose Value dialog.
 -
Click OK.
TIP: If you want to add multiple payors, copy the group code and paste it into the Plan File Payor Grouping column for the payors to include.
-
-
(Optional) Create payor deduction classification groups for specialized handling in your deductions forecasts.
-
(Optional) To map payors for use in Axiom Financial Planning, in the RF to FP Mapping column, double-click the folder icon to the left of the column and then select the FP payor code to associate with the Axiom Rolling Forecasting payor in the Choose Value dialog. FP Payor codes are listed in the Payor Update Report, available in Axiom Financial Planning from the FP Admin task pane under Administration > Dimension Update Utilities > Payor Dimension.
-
On the Main ribbon tab, click Save. Saving updates the corresponding Source column in the Payor dimension.
